The server application runs on IBM ESA or z/OS only.
Download the following zipped XMIT file and UNZIP first:
CUSTOMER.RA2002.TCPV110
After the UNZIP you will find a file called LINKLIB and SAMPLIB.
1) Install Host server
After the download of the Host server modules, which are stored in a zipped XMIT file format, unzip the file and upload it to the host. The XMIT file has the attribute of FB/80 BINARY.
HOST DASD Space Allocation requirements
FILE NAME | FILE TYPE | SPACE / TRKS | DIRECTORIES | SFORMAT |
| RA2002.TCPV110.LINKLIB | Linklib/Loadlib | 30,15 | 46 | U |
| RA2002.TCPV110.SAMPLIB | JCL sample | 3,1 | 46 | FB/80 |
Send XMIT file(s) to HOST
Use the Send Files to Host (MVS/TSO) window or any other FTP utility e.g. WS_FTPLE to send the XMIT files LINKLIB and SAMPLIB from your workstation to the Host.
Invoke the TSO RECEIVE command
You must RECEIVE the file sent to the HOST (your_user_ID.filename). The file sent to the HOST is still in the format of “The TSO/E Interactive Data Transmission Facility”.
The TSO/E Interactive Data Transmission Facility RECEIVE command allows you to obtain files transmitted to your user-ID. The RECEIVE command queries the Job Entry Subsystem (JES) on your behalf to determine if there are any files for your TSO user-ID. If there is at least one file, the RECEIVE command will obtain the file from JES and then display descriptive information about the file. You will then be prompted for information to control the RECEIVE operation. You may choose to accept the default dataset name (the original dataset name with your prefix replacing the sender's user-ID) and space information by simply pressing the key marked ENTER. You may also specify overriding parameters as described later on. After you have successfully received a file, the RECEIVE command will continue processing with any remaining files. If requested by the sender, a notification of receipt and the success of your RECEIVE command processing will be transmitted back to the sender.
RECEIVE
USERID(userid)
PARM(string)
INDATASET(dsname)/INDSNAME(dsname)/
INDDNAME(ddname)/INFILE(ddname)
LOGDATASET(dsname)/LOGDSNAME(dsname)
DISPLAY/NODISPLAY
NAMES/NONAMES
The RECEIVE command will prompt you for additional
parameters after obtaining a file from JES. If you
do not specify any parameters, they will be defaulted
or obtained from the control records transmitted with
the data.
ISPF Command Shell
Enter TSO or Workstation commands below:
===> receive userid(userid) indsname(‘RA2002.TCPV110.XMIT(LINKLIB)’)
===> receive userid(userid) indsname(‘RA2002.TCPV110.XMIT(SAMPLIB)’)
When issuing the TSO RECEIVE command you will be prompted to supply INMR906A Enter restore parameters or 'DELETE' or 'END'. Enter a data set name of your choice under which data set name the file will be stored. For example:
da(‘RA2002.TCPV110.LINKLIB’) and da(‘RA2002.TCPV110.SAMPLIB’)
Or
Execute the TSO/RECEIVE commands in batch mode:
//STEP1 EXEC PGM=IKJEFT01
//SYSLIST DD SYSOUT=*
//SYSTSPRT DD SYSOUT=*
//SYSLIST DD SYSOUT=*
//SYSUDUMP DD SYSOUT=*
//SYSTSIN DD *
RECEIVE USERID(???????) +
INDSNAME(‘RA2002.TCPV110.XMIT(LINKLIB)')
DATASET('RA2002.TCPV110.LINKLIB') UNIT(SYSDA) VOLUME(VOLSER)
RECEIVE USERID(???????) +
INDSNAME(‘RA2002.TCPV110.XMIT(SAMPLIB)')
DATASET('RA2002.TCPV110.SAMPLIB') UNIT(SYSDA) VOLUME(VOLSER)
2) Define APF LINKLIB and SCHED= in PARMLIB
The WebRACF interface requires that the following definitions are present in the PARMLIB:
member SCHEDxx ( "PPT PGMNAME(RA1$MAIN) CANCEL KEY(7) ")
member PROGxx (“APF ADD DSNAME(RA2002.TCPV110.LINKLIB) VOLUME(??????)”)
Note
When activating the SCHED member by using the T SCH= system command, make sure all other SCHED entries remain active as well. Audit should be made aware of this new entry in PARMLIB.
3) Define one STC procedure to start RA1$MAIN (TCPIP concurrent server address space)
A concurrent server accepts a client connection, delegates the connection to a child process of some kind (in here RACF commands), and immediately signals its willingness to receive the next client connection.
The WebRACF interface requires the following STC procedure:
//WEBRACF EXEC PGM=RA1$MAIN,PARM='PORT=11008'
//STEPLIB DD DISP=SHR,DSN=RA2002.TCPV110.LINKLIB
//RA1LOG DD SYSOUT=*
//SYSTCPD DD DISP=SHR,DSN=TCPIP.TCPPARMS(TCPDATA)
//SYSLIST DD SYSOUT=*
For test purposes you can run above procedure as well as a batch job. When running the procedure as a STC (started task) you must define the relevant items as well in RACF (RDEFINE STARTED ….) .
Specify in the PARM=’PORT=?????’ a port number you want to use in conjunction with the GUI. Optionally you can specify: TPCNAME=???????,TRACE=YES or NO . To stop the TCPIP server simply issue the ESA or z/OS ‘cancel’ command.
Note
1. RA1$MAIN will not work without a license key.
2. WebRACF depends on a CPU license key
4) Start the STC TCPV110 or use a name of your choice e.g. WEBRACF
To start the WebRACF server use the following JCL:
//*
//* RA1$MAIN main tcpip stc address space
//*
//WEBRACF EXEC PGM=RA1$MAIN,PARM='PORT=11007,TCPNAME='
//STEPLIB DD DISP=SHR,DSN=RA2002.TCPV110.LINKLIB
//RA1LOG DD SYSOUT=*
//SYSUDUMP DD SYSOUT=*
//SYSTCPD DD DISP=SHR,DSN=TCPIP.TCPPARMS(TCPDATA)
//SYSLIST DD SYSOUT=*
//SYSUDUMP DD SYSOUT=*
5) Protecting the CLI and functions
Each function of the WebRACF must be protected e.g. the CLI, functions(RESUME, REMOVE etc.). This allows an installation to release specific features to the users. Issue a PERMIT with the access attribute of READ to allow the use of a function. The final authorization if a user can execute a RACF command will be checked by RACF. WebRACF does not bypass any RACF security.
The following profiles must be defined in RACF:
RACF Class name is: FACILITY and UACC(NONE)
Profile names for the functions:
CONNECT: RA1$SERV.RA1$CONN
PERMIT: RA1$SERV.RA1$PERM
REMOVE: RA1$SERV.RA1$REMO
RESUME: RA1$SERV.RA1$RESU
REVOKE: RA1$SERV.RA1$REVO
CLI: RA1$SERV.RA1$0101
or you could utilize a generic profile e.g. RA1$SERV.**
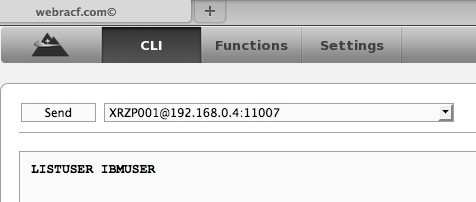
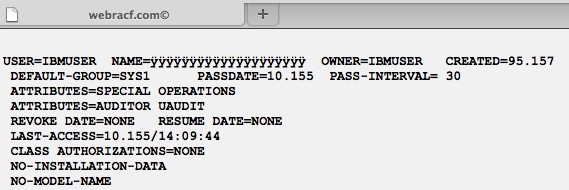
6) Final test
Invoke the WebRACF client and connect to the PORT defined in the STC and try any of the functions.